Oven Cleaning in Your Home: A Practical, SEO-Friendly Approach to a Fresher Kitchen
Oven cleaning is one of those household tasks that many people postpone for as long as possible. Yet, a clean oven can make a remarkable difference in how your kitchen looks, smells, and performs. If you have ever opened your oven door and noticed baked-on grease, stubborn carbon deposits, or lingering odors, you already know why oven cleaning matters. A well-maintained oven does more than improve appearance; it can also support more even cooking, reduce smoke, and help your appliance last longer.
Whether you clean your oven regularly or only when the buildup becomes impossible to ignore, understanding the right approach can save time and effort. Many homeowners search for oven cleaning methods that are effective, safe, and realistic for busy schedules. The good news is that oven cleaning does not have to feel overwhelming. With the right routine, tools, and techniques, you can keep your appliance in much better condition and avoid the frustration of heavy scrubbing.
In this article, we will explore the most useful methods for oven cleaning, common mistakes to avoid, how often to do it, and why professional oven cleaning can be a smart option for households that want deep results. You will also find practical tips to make maintenance easier, plus advice on keeping your oven cleaner between deep cleans. If you are looking for a cleaner kitchen and better cooking performance, oven cleaning is a great place to start.
Why Oven Cleaning Matters More Than Many People Realize

Oven cleaning is not just about aesthetics. A dirty oven can affect the way food cooks, create unpleasant smells, and even cause smoke during preheating. When grease and food residue accumulate on the interior surfaces, they can burn during use and release odors into your kitchen. Over time, that buildup may also affect heat distribution, making it harder for your oven to perform efficiently.
Regular oven cleaning also helps reduce the risk of flare-ups caused by excess grease. If your oven has a self-cleaning function, that can be useful, but it is not a complete replacement for routine care. In fact, some types of grime are easier to remove before they become hardened. By cleaning your oven consistently, you can minimize heavy buildup and keep maintenance manageable.
Another important reason to stay on top of oven cleaning is appliance longevity. Grease, debris, and spills can eventually impact components such as racks, fans, and seals. Keeping the appliance clean supports smoother operation and can help you get more value from your investment. For households that bake, roast, or broil often, regular oven cleaning is a simple habit with long-term benefits.
Signs Your Oven Needs Cleaning

Many people wait until their oven looks extremely dirty before taking action, but there are several early signs that indicate it is time for oven cleaning. One of the most obvious signs is visible residue on the interior glass, racks, or walls. If you notice dark patches, sticky spots, or hardened drips, the oven likely needs attention.
Smoky odors are another common sign. When food residue burns at high temperatures, it can produce smoke and a strong smell that lingers in the kitchen. If this happens regularly, oven cleaning should be part of your maintenance routine. You may also see a haze or film on the oven window, which can make it harder to monitor your food as it cooks.
Other warning signs include:
- Uneven cooking or inconsistent heat performance
- Visible grease around the door seal
- Food spills that have hardened after multiple uses
- Excessive smoke during baking or roasting
- Persistent burnt odors even after the oven cools
Preparing for Oven Cleaning the Right Way

Before starting any oven cleaning process, preparation is key. Taking a few minutes to get organized makes the job easier and helps protect the surrounding kitchen surfaces. First, make sure the oven is completely cool. Cleaning a warm oven can increase the risk of burns and may also make certain products less effective. Once the appliance is cool, remove the racks, trays, thermometers, and any loose accessories.
It is also helpful to place towels or newspapers on the floor in front of the oven to catch drips or debris. If you are using a commercial cleaner, read the label carefully and follow the safety instructions. Ventilation matters too, especially if the product has strong fumes. Open a window or switch on an extractor fan before you begin.
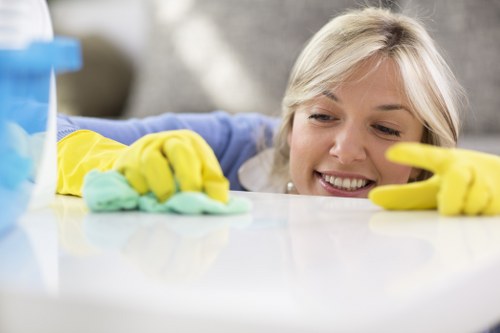
Gather your supplies in advance so you do not have to stop midway through the job. Basic oven cleaning supplies may include a non-scratch sponge, microfiber cloths, a soft-bristle brush, rubber gloves, warm water, baking soda, vinegar, and a spray bottle. Being prepared makes oven cleaning smoother, safer, and more efficient.
Useful supplies for oven cleaning
- Rubber gloves
- Microfiber cloths
- Non-abrasive scrub pad
- Baking soda
- White vinegar
- Warm water
- Old toothbrush or detail brush
- Bucket or bowl
Different Oven Cleaning Methods You Can Use

There is no single best method for oven cleaning because the right approach depends on how dirty the appliance is and what type of oven you have. Some people prefer natural cleaning solutions, while others use store-bought oven cleaners for faster results. In some cases, a combination of methods works best.
1. Baking soda paste
The baking soda method is one of the most popular choices for oven cleaning. Mix baking soda with a small amount of water to form a spreadable paste. Apply it to the interior surfaces, avoiding heating elements and vents. Let it sit for several hours or overnight so it can loosen grime. Then wipe it away with a damp cloth and finish with a light vinegar spray if needed.
2. Commercial oven cleaner
Commercial products can be effective for heavy buildup. They are designed to break down grease and baked-on residue quickly. Always wear gloves, ensure good ventilation, and follow the product directions carefully. This method is often chosen for deep oven cleaning jobs where natural products may not be strong enough.
3. Steam cleaning
Some ovens include a steam-clean or easy-clean function. This method uses heat and moisture to soften grime, making it easier to wipe away afterward. Steam cleaning may be ideal for light to moderate buildup, but it is usually less effective for thick, hardened deposits.
4. Self-cleaning cycle
Many modern ovens have a self-cleaning cycle that uses very high heat to burn residue into ash. Once the cycle ends and the oven cools, you can wipe away the remaining debris. While convenient, this method can create odors and is not suitable for every household. Always check the manufacturer’s instructions before using it.
5. Professional oven cleaning
For deeply neglected ovens or busy homes, professional oven cleaning can be a practical solution. Specialists have the tools and products needed to tackle stubborn buildup more efficiently. This option is especially attractive when you want a thorough result without spending hours scrubbing.
Choosing the best method
When deciding on an oven cleaning approach, consider the condition of the appliance, your available time, and whether you prefer natural or commercial products. A lightly soiled oven may only need a quick wipe-down, while a heavily used oven with thick grease may require a stronger solution or professional attention. The best oven cleaning method is the one that balances safety, effectiveness, and convenience.
Step-by-Step Oven Cleaning Process for Better Results
If you want a systematic way to approach oven cleaning, following a step-by-step routine can help. The process below works well for most standard ovens and can be adapted depending on the method you choose. It is simple enough for regular maintenance but still effective for more stubborn buildup.
- Remove racks and accessories
Take out all removable components so you can clean them separately. This gives you better access to the oven interior. - Brush away loose debris
Use a dry cloth or soft brush to remove crumbs and loose particles before applying any cleaner. - Apply your chosen cleaner
Whether you are using baking soda paste or a commercial product, cover the dirty areas evenly. - Allow dwell time
Let the cleaner sit long enough to soften grease and residue. This step is important for easier scrubbing later. - Wipe and scrub gently
Use a non-scratch sponge or cloth to remove loosened grime. For stuck-on areas, use a soft brush or toothbrush. - Clean the door and glass
Pay attention to the oven door, handle, and glass window, where fingerprints and splatters often collect. - Rinse and dry
Remove cleaner residue with a damp cloth and dry all surfaces thoroughly before replacing the racks.
This method makes oven cleaning more predictable and less intimidating. When you break the task into steps, it becomes easier to manage and less likely to be postponed.
How to Clean Oven Racks, Glass, and Trays
Oven cleaning is not complete unless you also clean the removable parts. Oven racks can accumulate thick grease and burnt-on food, especially if spills drip from roasting dishes or casserole pans. The easiest way to clean them is to soak them in warm water mixed with dish soap or baking soda. After soaking, use a non-abrasive pad or brush to remove residue.
The oven glass needs special attention because it often shows streaks, splashes, and cloudy buildup. A paste made from baking soda and water can work well on glass surfaces. Apply it gently, wait several minutes, and wipe it away with a damp microfiber cloth. Avoid harsh scouring pads that could scratch the glass.
Trays and baking sheets should be cleaned separately using a degreasing dish soap or a paste cleaner. If they have tough spots, let them soak longer before scrubbing. Detailed attention to racks, glass, and trays improves the overall quality of oven cleaning and helps your appliance look and perform better.
Common mistakes to avoid
- Using metal scrapers on delicate surfaces
- Cleaning while the oven is still hot
- Ignoring the door seal and corners
- Mixing cleaning chemicals without checking safety information
- Leaving chemical residue behind after cleaning
Oven Cleaning Tips for Busy Households
For many families, oven cleaning is difficult to fit into an already packed schedule. The key is to make it part of a manageable routine rather than a rare, exhausting task. Small habits can dramatically reduce buildup and make deep cleaning less frequent. If you cook often, a quick wipe-down after the oven cools can prevent spills from hardening.
Another effective strategy is to use oven-safe trays or liners where appropriate, as long as they do not interfere with airflow or violate manufacturer recommendations. Catching drips before they reach the oven floor can simplify maintenance. You can also place dishes on a baking tray to contain splatter during roasting.
Setting a recurring reminder for oven cleaning can help ensure the task does not slip through the cracks. Many people find it useful to schedule a light cleaning every few weeks and a more detailed clean every few months. Consistency is the secret to easier oven cleaning.
Quick maintenance habits that help
- Wipe spills after each use once the oven is cool
- Check the window regularly for grease buildup
- Remove crumbs from the bottom before they burn
- Clean the racks before residue becomes thick
- Use lids or foil carefully to prevent splashes
Why Professional Oven Cleaning Can Be Worth It
While many homeowners can handle routine oven cleaning themselves, professional oven cleaning offers several advantages. It is especially useful when the oven has years of buildup, when the appliance has delicate parts, or when you simply do not have time to do it yourself. A professional service can often remove grease and grime more thoroughly than a quick DIY session.
Another benefit is convenience. Instead of spending hours scrubbing and worrying about whether you are using the right product, you can rely on trained specialists to handle the job. Professional oven cleaning may also be a better choice if you want to avoid harsh fumes, heavy labor, or the risk of damaging internal components.
For households preparing for a move, hosting an event, or trying to restore an oven that has been neglected for months, professional help can make a noticeable difference. If you want excellent results without the hassle, book your service now and let experts handle the hard work.
At the same time, professional oven cleaning does not mean you should ignore maintenance afterward. A good follow-up routine will help preserve the clean finish and reduce the need for another major deep clean too soon.
How Often Should You Schedule Oven Cleaning?
How often you need oven cleaning depends on how frequently you cook and what types of meals you prepare. Homes that bake casseroles, roast meats, or use the oven several times a week usually need more frequent care than households that use the appliance only occasionally. As a general rule, light cleaning should happen regularly, while deeper oven cleaning can be done every few months.
For example, a family that uses the oven daily may benefit from a quick wipe after spills and a more thorough cleaning every one to two months. A smaller household with lighter use may only need deep oven cleaning three or four times a year. The main goal is to prevent buildup from becoming so heavy that it affects performance or becomes difficult to remove.
Watch your oven rather than relying only on a calendar. If you see smoke, smell burning residue, or notice thick grime, it is time to act sooner. A flexible cleaning schedule usually works better than a rigid one because every kitchen has different needs.
Factors that affect cleaning frequency
- How often the oven is used
- Whether food is baked, roasted, or broiled regularly
- The type of meals prepared
- Whether spills are cleaned quickly
- Whether the oven has a self-cleaning feature
Safe and Effective Oven Cleaning Practices
Safety should always come first during oven cleaning. Even natural products can cause irritation if used incorrectly, and stronger commercial cleaners may require extra care. Always wear gloves when handling cleaning solutions, and avoid inhaling fumes. Good ventilation is especially important if you are using a stronger product or running the self-cleaning cycle.
It is also wise to test any new product on a small, hidden area before applying it broadly. Different ovens have different finishes, and not all surfaces respond the same way. Avoid using abrasive tools unless the manufacturer says they are safe. A gentle but consistent method is usually better than aggressive scrubbing.
If your oven has a self-clean mode, read the manual first. Some models have specific instructions about rack placement, ventilation, and cycle duration. Following the manufacturer’s guidance helps prevent damage and makes oven cleaning safer overall. Safe oven cleaning protects both your appliance and your household.
Keeping Your Oven Cleaner Between Deep Cleans
The best way to reduce the workload of oven cleaning is to prevent dirt from building up in the first place. That means dealing with spills quickly and building simple habits into your cooking routine. When a spill happens, wait until the oven cools and wipe it away before it hardens. This small step can save significant time later.
Using covered dishes, baking trays, and roasting pans that contain splatter can also help. If you use the oven frequently, a quick weekly inspection can prevent surprises. Even a two-minute check can reveal crumbs, grease spots, or minor buildup before they become a bigger problem.
Another practical tactic is to clean the oven door and knobs regularly. These small visible areas influence how clean the whole kitchen feels. Minor maintenance supports better oven cleaning results and helps the appliance stay in good shape longer.
Simple prevention habits
- Wipe spills promptly after cooling
- Use cookware that minimizes splatter
- Check the oven interior weekly
- Keep racks clean before residue hardens
- Avoid overfilling dishes that may bubble over
Final Thoughts on Oven Cleaning
Oven cleaning is one of the most worthwhile household maintenance tasks you can do. It improves hygiene, reduces odors, supports better cooking results, and helps your appliance last longer. Whether you choose a natural method like baking soda, a commercial cleaner, a self-cleaning cycle, or professional oven cleaning, the key is consistency. The longer grease and residue stay in place, the harder they are to remove.
A clean oven contributes to a cleaner kitchen overall. It also gives you peace of mind every time you cook, knowing that your appliance is working as it should. If your oven has been neglected for a while, now is the perfect time to take action. Start with a basic wipe-down, build a routine, and consider a professional deep clean when the job feels too large to manage alone.
Contact us today to take the first step toward a cleaner, fresher kitchen environment. If you are ready for a spotless appliance and easier upkeep, book your service now and make oven maintenance simpler from this point forward.